Stamping Away From Home

Last fall I was very fortunate to be invited for a wonderful weekend at the beach by a very generous stamping friend (Thank you, Sue!!!).  Knowing that the plan was to do some stamping together, I gave some thought to the question of how to stamp away from home.

The challenge, of course, is to bring enough supplies to be productive, but not so many supplies that you require a U-Haul to transport them!  Here is the list of basic supplies that I recommend.

  • Compact paper trimmer such as Fiskars Portable Paper Trimmer, 12 Inch
  • Rubber stamp markers for inking stamps and coloring images
  • Black ink pad
  • Scissors
  • Adhesive of choice (I like Scotch Double Sided tape)
  • Rubber stamps
  • Stamp cleaning supplies (or make do with wet and dry paper towels)
  • Card stock
  • Storage case such as Iris 12×12″ Scrapbook Case (if you can get everything in a smaller case, even better!)

These items are fairly basic and obvious.  The real question that I struggle with is what stamps and card stock to bring.

One option is to choose a pack of decorative papers (DP), then bring card stock that coordinates, and one or two stamp sets to use with these.  Depending on space available, you may then want to bring ink pads to match the card stock chosen.  You could also do this without DP, just select one or two stamp sets, then choose three to five card stock colors to use with the stamp sets.

This still leaves me anxious that I’ll be making a card with these limited supplies and wish I had a certain die, punch, ribbon, etc.

Coloring Images

One option is to stamp images at home and just bring Copics, colored pencils (my favorites are Sanford Prismacolor), or another coloring medium of choice.  Coloring can be very relaxing and the colored images can be made into cards when you get home.

Card Kits

A great solution that was proposed by my recent hostess was that each of us design a card and create card kits for the other three stampers to make five of the same card.  We all then took turns assembling the card kits with each others’ supplies.

In addition to all the supplies needed to assemble the cards, we prepared our card kits by pre-cutting the card stock and DP needed and in some cases stamping the images for the cards so that everything could be packed more compactly. This reduced the need for large sheets of card stock, stamps, ink pads and stamp cleaner.  Finally each stamper brought her own adhesive of choice to use in assembling her card kits.

The card kits had several great advantages.

  • All the supplies needed to make the card were planned out ahead and provided.
  • Assembling the cards was really easy, so we were able to socialize at the same time.
  • We learned techniques from each other such as coloring with Copics and how to use a paper tearing tool.
  • Sometimes we made slight changes to the card design and the card designer gained new ideas.
  • We each went home with fifteen finished cards!

The card kit method worked great in a group, but it would also work well for an individual stamper.  Plan out one or more cards, then bring the supplies you’ll need to complete the cards.

I’m excited to try this idea for stamping while enjoying the beautiful weather from my porch as opposed to my windowless basement stamp room this summer.

I’m interested to hear other suggestions for stamping away from home.  How do you stamp away from home?

Happy Stamping!

Stacy
The Simple Stamping Challenge

This post was originally on my previous blog December 2013.

I have challenged myself for the next year to create simple greeting cards.

Now this may sound odd since most people challenge themselves to do things that are harder or more advanced than they have done before.  But for me, this will be quite a challenge.

I have long admired rubber stampers and paper crafters who make very simple cards, such as the beautiful cards of Susan’s Simplicity blog.  But having made cards that usually have multiple layers of card stock and embellishments for over 18 years, it’s hard for me to feel that one layer cards are “good enough.”  I am also a member of a wonderful local rubber stamp club which I helped start and continue to coordinate.  So when I make cards for these ladies, I feel guilty giving a simple card.

Yet when I make a simple card, I often find much satisfaction with the result and especially enjoy the reduced anxiety over creating a “masterpiece.”  Furthermore, making a great clean and simple card can sometimes be more challenging than one that is elaborate since you have fewer elements to arrange in an artistically pleasing design.

With three kids aged almost 13 down to 6, time for stamping is limited and it’s my hope that removing the burden of creating a time consuming, elaborate card will help to fuel my creative inspiration.

So starting now, through this coming year, I give myself permission to make and give simple cards without guilt.  I hope to learn whether my family and friends will be just as enthusiastic about the simple cards as my elaborate cards of the past.  I also hope to discover whether making clean and simple cards helps me find my lost stamping mojo.  (More about finding inspiration in the future.)

I would very much enjoy hearing my readers’ thoughts on simple vs. elaborate cards.

I start my Year of Simplicity with the following cards.

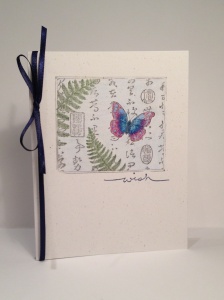
Butterfly and Ferns Wish Card
Snowflakes Thank You Card

Happy Stamping!

Stacy

Butterfly and Ferns Wish Supplies: Natural card stock with fibers, Hero Arts Butterfly with Ferns stamp colored with Berol Spectracolor pencils (love these art pencils!), Stampin’ Up! wish stamp in Not Quite Navy ink, navy ribbon.

Snowflakes Thank You Supplies: Stampin‘ Up! Snowflakes in Baja Breeze ink and script thank you stamp in Not Quite Navy ink.

Christmas Stocking Tags

This post was originally on my previous blog December 2013.

Christmas Stocking TagsMy kids don’t always choose the same Christmas stockings each year, so I made stocking tags to help Santa.  The tags have a loop of ribbon on them so that they can be switched to a different stocking if needed.  I added the kids’ names to their tags after taking the photo.

Happy Stamping and Happy Holidays!

Stacy

Supplies:  Each has a circle and scallop circle made with Spellbinders Nestibilities circle dies, names written with Sanford or Zig felt tip calligraphy pen;
Stampin’ Up! Snowflake stamp in SU Ballet Blue ink, layered on SU Bliss Blue card stock;
PSX Carousel Horse stamp colored with Copic markers, layered on SU Raspberry Ripple card stock;
Snoopy and Wood “Snow Sledding” stamp colored with Copic markers, layered on SU Handsome Hunter card stock;
Stampendous Holy Night nativity silhouette stamp in SU Handsome Hunter, layered on SU Raspberry Ripple card stock;
Delafield Santa rabbit stamp G619 colored with Copic markers, layered on SU Handsome Hunter card stock.

Stampin’ Up! SaleABration Fundraiser

This post was originally on my previous blog December 2012.

With the Stampin’ Up! annual Sale-A-Bration (SAB) promotion coming up soon, I thought it was a good time to share my ideas for making your SAB party a fundraiser!

A couple of years ago, I really didn’t want all the hostess gifts that I earned with each workshop. (Hard to believe, I know, but I’d been stamping and collecting for over 10 years.)  I decided instead to share the hostess gifts with my guests in exchange for them helping me raise money for a charity.

Over the next couple of years my demonstrator, Amy, and I developed a plan that worked well for us.

Each guest who placed an order of $50 or more AND made a $10 donation to my chosen charity would receive one of the hostess gifts from the workshop.  I found that all my guests were quite willing to make a $10 donation and it seemed reasonable for a chance at a hostess gift that they wouldn’t otherwise be able to get without hosting a large SU party.  Several friends consistently gave much more than I asked.

I made a Hostess Gift Preference Form so that each person could let me know their preference for the various types of hostess gifts (see below).  I required that each person send me their preference form a couple of days before the workshop so that I could have the hostess gifts mostly planned out ahead of time.  I spread them out and then try to honor as many first choices as possible, then second choices.  Usually I can give most guests their first choices.

I also encouraged my guests to send their orders ahead of time even if they were attending so that I could have the hostess gifts partly planned out ahead of time.  Anyone ordering but not attending was asked to email their order and Hostess Gift Preference Form two days ahead so that we could make final hostess gift choices at the party.

I don’t include an option for Level 3 hostess gifts in order to maximize the number of gifts available for my guests.

I ask each guest to write a check for their donation separate from their order payment so that they can receive the tax write-off for it, and to simplify order processing.

We found that those who received the free merchandise needed to choose an item not exceeding the amount they were given.  If it exceeded, it really complicated the processing of the order for the demonstrator.  (I don’t recall the issue exactly, but it involved requiring the hostess to pay any amount over the free merchandise credit.  While that doesn’t seem so complicated, for some reason the way the orders are submitted, it was.)

My hostess gift preference form says that free merchandise “will be at least $5; hopefully $10 or more.”  The “at least $5” is included primarily as a disclaimer.  I think it was always $10 or more, but if you don’t get a lot of orders, then you’re covered.

It’s up to the hostess how to award the hostess gifts to her guests.  As I mentioned above, I disregarded how much my guest spent since they all fulfilled my base requirement of $50 order and $10 donation. But as long as you state it ahead of time, you could use the order amount as a factor if you wanted.  You could also auction off the gifts (payments going to the charity).  Originally, I drew the forms from a bowl as in a raffle, but I found that I could satisfy most of the first and second choices much better by just comparing and planning them out.

Hostess Gift Preference Form

Please number ALL of the following in order of your preference. Where indicated, please fill in the hostess gift or Sale-A-Bration gift you would like if you win that item.  You will receive ONE of these items, but must indicate your preference for ALL of them since I can’t guarantee which you’ll get.  Please let me know if you have any questions.

___ Level 1 Hostess Gift- Item name and number ________________

See the main catalog, page _______

___ Level 2 Hostess Gift Item name and number ________________

See the main catalog, page ______

___ Additional Sale-A-Bration Gift Item name and number _______________

See the Sale-A-Bration catalog.

___ $ for free merchandise (will be at least $5; hopefully $10 or more, but will depend on the workshop total;  if you win this gift, I will contact you and ask for your choices)

Happy party planning and happy stamping!

Stacy

E-Book Pricing

This post was originally on my previous blog September 2013.

Amazon.com and the big publishers may never see this post, but I feel compelled to speak my mind nonetheless.

In case you haven’t heard about the ebook pricing battle between Amazon and the big six publishers, basically Steve Jobs of Apple and the big six publishers forced Amazon to stop offering ebooks at deeply discounted prices.  The US Justice Dept. began an investigation in 12/2011 to determine whether this constituted collusion to fix prices.

As a result of the efforts of the big six publishers, Amazon has no control over the pricing of ebooks from the big publishers Hachette, HarperCollins, Macmillan, Penguin Group, Random House, and Simon & Schuster.  Instead, these publishers dictate to Amazon what the ebook prices will be.

As a consumer, I certainly would love to be able to get really cheap ebook copies of the top selling novels.  However, I can also appreciate that publishers spend a lot of money to cultivate new authors, edit their writing and promote their books.  Publishers say that they have the best chance of making back the money invested in a book through the hardback book sales.

So just as we all learned to get along with others in Kindergarten, ebook pricing also comes down to a simple matter of compromise between Amazon and the publishers.

My proposal is that during an agreed upon initial hardback sales period of about three to six months, Amazon could discount the ebook version of a book no more than 40% off the print list price.  That would mean that a book selling for $25 in hardback would sell for $15 in ebook.  This pricing would prevent the ebook from being priced so low that it’s sales cut into the hardback sales, and yet prices ebook version at an amount that takes into consideration it’s lower cost to manufacture and distribute.  Three to six months is typically the time period during which the book has the longest wait time for availability at the public library, so making the ebook available at a moderate discount also increases the book sales in this format at a time when it’s difficult to acquire through the library.

After the initial sale period, Amazon and other resellers could discount ebooks without limitation.  The $9.99 Boycott indicates that many ebook readers feel that $9.99 or less is an appropriate ebook price and this point in a book’s life would be a good time for that price.

This arrangement actually has an advantage to publishers in that it allows resellers to price ebooks competitively with used books and paperback copies and thereby increase book sales.  Ebooks are much less expensive to produce and distribute than print copies and therefore, have the potential to generate a higher profit per sale.

In the case of used book sales, publishers make nothing each time a used book is sold.  However a publisher makes money every time that an ebook is sold since it cannot currently be sold secondhand, so competitive pricing of ebooks in the later phase of sales actually benefits publishers.

An ebook should continue to be discounted throughout it’s life approximately a dollar a year.  Once it has been out five to ten years, the ebook should be priced at $5 or less.  This pricing allows an older ebook to be competitive with the pricing of the used print copies.

For more information on Kindles and ebook pricing, see my Kindle Notes page.

Parental Movie Reviews

This post was originally on my previous blog September 2013.

As a parent I strive to closely supervise the movies that my kids watch.  It isn’t always easy to know which movies are appropriate for kids, but I’ve found some great tools that make at least this part of parenting much easier.  There are a couple of web sites with movie reviews for parents and I wanted to share them in the hope that they’ll make parenting easier for others as well.

IMDB

IMDB.com, the Internet Movie Database, is a great collection of movie information.  You can look up any movie, TV show, or actor.  From there, you can look up a wealth of related info.  It’s great for settling that nagging question of “That actress looks really familiar.  What else have I seen her in?”

IMDB also has a detailed Parents Guide for each movie that can help a parent decide which movies are appropriate for their kids and consistent with their values.  Users have submitted information from the movie for each of the following categories: Sex and Nudity, Violence and Gore, Profanity, Alcohol/Drugs/Smoking, and Frightening/Intense Scenes.

I’ve looked at a lot of parental review sites and I’ve found this format to be the best combination of detailed information and concise format.

Common Sense Media

CommonSenseMedia.org is another great site for parental reviews of movies, books and video games.  CommonSenseMedia gives reviews of movies and a recommended minimum age for each movie.  It also has a rating for content in the categories of positive messages, violence, sex, language, consumerism, and drinking, drugs and smoking.

Movie Ratings

One of the reason that I find parental movie reviews so helpful is that even when I’ve seen a movie in the past, I often can’t accurately recall what details might not be appropriate for kids.  An example of this is the movie Big from 1988 with Tom Hanks.  This movie is about a boy 12 year old boy who wakes up in the body of grown man and has a PG rating.  However, because the boy finds himself in a number of adult situations, it is best that parents make an informed decision about whether a movie is appropriate for their kids instead of relying on the movie rating.

Howard County Library Hidden Features

This post was originally on my previous blog July 2012.

I am a big fan of our local library in Howard County, Maryland!  I love being able to get free books, movies, and music!

The Howard County Library has a great web site, but I’ve notice that there are a number of great features that while not exactly hidden, are not known by many other library patrons.  Even if you’re not a Howard County resident, your local library may have these features, or you can request them.

Get Almost Any Book!

The Howard County Library has a lot of great books, but they don’t have everything, of course.  If you’re looking for a particular book the obvious first step is to search the library catalog.  You can do this from home at http://hclibrary.org, or from the library.

If you don’t find the book in the catalog, the next step is to search Marina.  Marina is a searchable network of Maryland libraries.  To access Marina, go to the Howard County Library home page and click the “How do I…” pull down. Then select “Use interlibrary loan.”  This screen includes information and instructions for Marina.  You’ll just need a Maryland library card number for a Marina request, and there is no charge.

If the book is not found through a Marina search, the next step is the last link on that page, “Request form for academic or out-of-state libraries.”  Sometimes this is just called ILS for Interlibrary Loan. There is a $1 fee for this interlibrary loan request if they find your item.

Request an Addition to the Collection

There is a form on the library web site under the Contact Us link (top right corner of the page) that patrons can use to request that the county library purchase items not already in the catalog.  From the Contact Us Page, click the “Suggest” link under “Make a purchase suggestion.”  Then find the item in Amazon.com, and copy and paste the ISBN, publisher and date published from there to the library form.

Another great option with this feature is that you can specify on the form that you would like to be placed on the wait list for this item if they decide to purchase it.

Suspend a Hold Request

I love being able to search for books, movies and CDs from my home computer and place a request so that they’re waiting for me the next time I go to the library.  With young children it’s been especially nice to be able to do this as opposed to hunting around the library for items while dragging a small child.  Then we can focus our library time on finding children’s books and pick up mine at the circulation desk!

An extra feature available for holds is Suspended or Inactive Hold Requests.  When you place a hold request, you can specify a future date that you want the hold activated instead of today’s date.  This is great for placing holds on my future book club books or scheduling my book holds so that my reading materials are spaced out conveniently.  The best part about this feature is that you continue to move up the hold queue while the hold is suspended, then when it is reactivated, you are at the top of the list or at least closer to the top of the list.

If you have already put a book on hold you can also go to the Hold Requests page of the Howard County Web Site and suspend a currently active hold.  Just check the box next to the item(s) that you want to suspend, then click the Suspend/Reactivate Selected button. Enter the date on which you want the hold reactivated.  I suggest setting the reactivate date for about 5 days before you need the book to allow time for the library to get it to your branch.

If you want to reactivate a suspended hold before the reactivation date you specified, you can just repeat the above steps and specify today’s date.

Free eBook and Downloadable Audiobook Loans Via Overdrive!

Most Maryland public library patrons can borrow ebooks through their library’s Overdrive subscription.  (I was told that the following information applies to all Maryland public libraries with the exception of Prince Georges County which has a separate subscription to Overdrive.)

To access the Overdrive site from the Howard County Library site, click the “How do I…” pull down and select “Find an e-book.”  This brings up the Electronic Books and Audiobooks page.  This page includes the link to the Overdrive database site, instructions for downloading ebooks to various ebook readers, and information about scheduling One-on-One Sessions to learn about borrowing ebooks from Overdrive.  I highly recommend the One-on-One Session.  I attended a class version of the session and even though I already knew a lot about Overdrive and ebook readers and picked up some interesting information.

When you’re ready to search the Overdrive database for ebooks or audiobooks, click the “Maryland’s Digital eLibrary Consortium (OverDrive)” link.  The Maryland Digital eLibrary Consortium is a group Overdrive subscription for most of the Maryland public libraries (except Prince Georges County as I was told.)

Overdrive allows you to check out 4 items at a time.  For each item, you can select a checkout period of 7, 14 or 21 days.  Kindle ebooks may be returned early through the Manage My Kindle page on Amazon.com (though if you return too many items early in a short time they will freeze your Overdrive account for copyright issues).  You may also place a hold on 4 items at a time on Overdrive.  I plan my holds so that I have 1-2 long term holds (long hold lists) and 1-2 short term holds (short hold lists), so that I have something to read while waiting for the longer hold list items.

Following are a couple of the tips that I learned at the “Are You EReady?” class at the library:

  • The advantage symbol OverDrive Advantage titlenext to some books means that my county library has purchased extra copies of that item for just the patrons in that county.  So if you place that item on your Hold List, you may receive it earlier that it would appear based on the number of people on the hold list.
  • It is recommended that you search the Overdrive site through the link above as opposed to searching the Howard County Library catalog web site for electronic materials.  The county library catalog is not updated very often, whereas the Overdrive site is always current.

For additional information about Kindles and other eReader devices, please see my page linked from http://tealdragon.net/giftshop.

What is your favorite feature of the library?  Were any of these features new to you?

Happy Reading! 🙂

Stacy

Lego Storage

This post was originally on my previous blog on September 2013.

My 12 year old daughter is a big fan of Lego building.  She has a large collection of Legos in her room and we recently found an inexpensive way to store them that has worked very well.

She had been collecting her Legos in many yogurt cups and other containers, and grouping them into cardboard trays from soup cans and other canned goods, but the trays of cups were spread out on her floor.

We found craft storage cubes which have four shelves each and the cardboard trays fit in them like drawers.  The Recollections 4 Shelf Organizer Cubes are available at Michael’s craft stores and go on sale a couple times a year.  I think we bought them with a buy one, get one free special.  You could also buy them one at a time 40% off coupons.  Make sure that whatever containers you use to put the Legos in will fit inside the shelf.

The cubes can be stacked or lined up along the wall.  The top of the cubes makes a nice place to display Lego sets or more storage area.

When she is building, she pulls out the trays of Legos she needs.  Then when she’s done, its easy to put the trays back on the shelves.  Legos can also be grouped into trays by type and labels added to the ends of the trays to easily locate the pieces needed.

Have fun organizing!

Chores and Allowance

This post was originally on my previous blog November 2012.

The topic of chores and allowance often comes up with friends, so it seems like a good topic to share.

My kids are 11 to 5 years old and all have daily chores that they are required to do.  Their daily and weekend chore charts can be found at the link below.  Here’s an overview.

Daily Chores

My girls, ages 11 and 8 have a daily chore chart that that we print each month.  It includes basic tasks required for taking care of themselves such as brushing teeth and remembering their allergy medicines, to helping around the house.  Each chart has enough columns for a whole month.

My son, age 5, has a much simpler daily chore chart with larger print since he’s just beginning to learn to read.  Most of his chores are tasks for taking care of himself, but there are several for helping out throughout the day, including packing his lunch (a reminder to him to ask for help.)  He also is asked to put the silverware away each time we run the dishwasher.  With age, each child’s chores change and/or increase.

Weekend Chores

The girls have a weekend chore chart since they have additional jobs that they need to do each weekend.  This chart covers several weeks’ time.  These jobs include

Cleaning a bathroom – wiping down the sink and mirror and scrubbing the toilet (with just water, I come along later and use a cleaning product but this way the scrubbing is already done.)

Changing their sheets – putting the dirty ones in the laundry and making their bed.

Lost and Found Box

A friend sent me the lost and found box idea that she saw on the Internet.  It’s a box where we put things that aren’t put away at the end of the day.  Each weekend, the kids are expected to check the box and if there is something of theirs, do an extra job to earn it back.  I borrowed the poem that someone else wrote and created my own sheet to attach to the top of the box.  The list on this sheet has also been useful when the kids aren’t getting along and need an extra job to keep them occupied.  The file can be found at the link below.

Weekly Allowance

We started giving each of our kids a weekly allowance when they began learning about money in kindergarten.  Each child gets half their age in allowance each week.  This means that at 5, they get $2.50, with a $.50 increase at each birthday.

I’ve heard of some families giving the child allowance to equal their grade, but we feel that this starts too low, and by 8th grade and older, gets too high quickly.

In our family, allowance is not payment for doing their chores.  There is no option to skip chores and skip allowance.  Chores are a required part of contributing to the family and household.  If they don’t do their chores, there is no video game or TV time.

It is understood that every week, they are expected to give at least $.25 of their own money in the church offering.

A great feature of giving allowance is that when we go to a store and my kids say they want something, I can say, “How much money do you have?  Can you afford it?”  They have learned from an early age that I don’t buy them things unless it’s a special occasion, so we have a lot less whining in stores.

Learning to manage their own money and decision making are additional benefits to receiving an allowance.  They have to learn the hard lesson that if they spend their money on a lot of little things, they won’t have money for something special they really want later.  I have noticed that it’s also a great lesson in general decision making since they have to weigh the value of what they want to spend their money on vs. how much they will really enjoy it.

It’s hard not to discourage them when they are considering buying something that I think is a bad idea, but I try not to give my own opinion.  We’ve written out pros and cons lists, and I’ve asked the questions, “What will you do with it?  How much do you think you’ll use it?”  In the end, I might say, that I don’t think it’s the best use of their money, but it’s their money, so it’s their decision.

Reminders and Complaints

The chore charts are very helpful for reminding them what they need to do and when, and allow us to make a quick check of what they’ve done.  I wish I could say that we don’t need to remind them to check the chart and that there were no complaints about jobs, but the system is not perfect just as people are not.  When my kids complain, I “offer” to give them more jobs, and I remind them how many more jobs their father and I have.  I also remind them that we are all a part of this family, and they they are all quite capable of sharing the workload around the house.

Chore Charts and Lost and Found Box Sheet

Girl Scout Brownie Household Elf Try-It

I volunteered to help my daughter’s Brownie troop by planning and leading a meeting in which we earned the Household Elf Try-It.  In addition to reading the badge requirement info for this Try-It, I searched online for meeting plans for this badge, but found very little.  Possibly this is because the badges have been revised very recently.  I am posting my meeting plan with the hope that it might help another Girl Scout leader or volunteer.

The Household Elf Try-It is about making your “home clean and green.”

Conservation Ideas

I created a Conservation Log and emailed it to the troop a week before the meeting, asking the girls to look around their home and school for ways that they can

1) save energy
2) save water
3) recycle and reduce trash
4) and clean the air.

The text from my log is below.  The girls were asked to bring the log to the meeting.

At the meeting, I divided the girls into three groups.  Each group was assigned one of the first three topics.  They discussed their answers to their assigned topic and planned which to present to the whole troop.  The girls were encouraged to present NEW ideas to the troop as opposed to the ideas they had heard before.  I had an older girl or adult in each group to assist them in coming up with additional ideas by asking questions such as

What do we throw away and what can we do with it instead?

How could we use less energy instead of driving to school or a friend’s house?

How could you save water when you shower?  How could you make your shower shorter? (sing or use a timer)

My older daughter and I modeled the presentations by presenting ways to clean the air since that seems like the most challenging topic to me.  The girls were also asked to choose several ideas from the presentations to use at home to help the environment more and note them on their conservation log.  Ideally we’ll discuss how that goes at a later meeting.

Reusable Gift Bag Project

Since our meeting was a month before Christmas, we decided that our project would be to make reusable gift bags that the girls could use for the holiday.  We collected small paper shopping bags (around 8×10″, such as Starbucks or Bath and Body Works) from the families.  We cut red and green card stock (from the craft store) for both sides of the bag to cover store logos.  Recycled holiday cards were used to decorate the bags, as well as holiday stickers.  A recycled holiday card also makes a great gift tag that you can tie onto the handle of the bag with ribbon.

It was difficult to get the paper to stick to some of the bags.  We used double sided tape, but it seemed to need at least 5 large pieces and a lot of pressing down to get it to stick.  (Some of the girls also seemed to get the tape stuck to the floor or their pants which made it much less sticky.)  I think the tape works better than glue sticks, but maybe there’s still another better adhesive.  Also, remind the girls to only write their name on the bottom of the bag, not the sides.

Ecology Song

While we made our gift bags, we sang an ecology song that I found in a campfire song book.  To keep with the green theme, I printed the song on half sheets of paper (2 to a page) and printed song sheets for every two girls to share.

River Valley Household Elf Try-It Plan
This was another meeting plan I found for this badge.
http://www.girlscoutsrv.org/get-involved/volunteers/troop-leaders/planning-guides/planning-brownie

Conservation Log

Following is the text I used for the conservation log that was emailed to the girls before the meeting.

Think about how you can help save energy and water, recycle and reduce trash, and clean the air around your home and at school.  List your ideas below in this log.  Bring the log to the next Brownie meeting and we will use the ideas for an activity towards earning the Household Elf Try-It.

Save Energy
Save Water
Recycle and Reduce Trash
Clean the Air

[space left after each of the 4 topics for the girls to write ideas.]

Suggested Conservation Ideas

Here are the ideas I came up with before the meeting.

Save Energy
Turn off lights and electronics when not in use
Seal around doors and windows to prevent drafts
Walk, or ride a bike instead of driving
Ride the school bus instead of driving to school
Use energy saving light bulbs
Clean the clothes dryer lint filter after every load
Use cold water instead of hot when possible

Save Water
Turn off water when brushing teeth and soaping hands
Take shorter showers
Use less water in the bath tub
Use a rain barrel to water the garden
Use dish washer and clothes washer only when full

Recycle and Reduce Trash
Learn to compost food scraps
Learn what can be recycled in your area
Reuse clean containers for crafts
Recycle plastic and plastic bags at the grocery store
Reuse school papers (blank on back) as scrap paper
Donate items or have a yard sale

Clean the Air
Replace home air filters
Plant trees
Grow house plants
Drive less — use the bus, walk or ride a bike
Use natural cleaning products (see recipes in badge requirements)